NZXT Kraken X53 RGB Review
INTRODUCTION
NZXT is back at it again with one of their iconic Kraken style All-in-One Liquid CPU Coolers. Last time we had a look at the Entry-level 120mm Kraken M22, but this time we can finally start looking at the Big stuff. With 2x 120mm Fans, an appropriate Radiator and many other improvements, NZXT is aiming the X53 at the Mid-Tier Performance market. But how it actually performs in the real world will be determined later on.
POSITIVE
- RGB Infinity Mirror
- Included RGB Fan
- Supports for most relevant AMD and Intel Sockets
- Slick Design
- RGB Controllable
- RGB Controllable over USB Header
- CAM Software (yes this is positive)
- Daysi-Chain RGB Fans
- 10% Larger Infinity Mirror
- Uses the original AMD Backplate
NEGATIVE
- Price
WHAT'S IN THE BOX?

As expected from NZXT, the Kraken X53 RGB comes in the iconic clean White-Purple Box. Just like the other Kraken's, an image of the X53 is featured on the front, while the Sides feature some explanations and a Specsheet.
On the Back, NZXT’s CAM software is introduced. By connecting a CAM-Capable Device, the User has the possibility to control each of these devices by using a Nice-looking and easy-to-use Interface.
Because of their CAM Software, NZXT could ditch the support for the Mainboard RGB Controlling Softwares that we usually encounter on the Box.
The left side of the box includes a spec sheet, but in order to save you the hassle of reading text on an image, we summarized the most important parts:
| Radiator Dimensions | 240mm |
| CPU Waterblock Dimensions | 80x80x55mm |
| Tube Length | 400mm |
| Fan | NZXT AER RGB 2x2 |
| Fan Size | 120mm |
| Fan Specs | 1500RPM/52.44CFM/1.35mm/H2O |
| RGB Control Method | NZXT CAM Software |
| Pump | Asetek 7th Gen |
| Pump Speed | 800-2800RPM |
After removing everything from the box, we can find every component wrapped in an individual plastic bag. As we have noticed with previous NZXT Kraken AIO's, the Fans are not premounted on the Radiator and have to be installed by the user by using the included Screws.
In total, the Box contains the following Components:
- NZXT Kraken X53 AIO (Radiator + Waterblock)
- NZXT AER RGB 2 Fan x2
- Intel Backplate x2
- AMD CPU Bracket
- Intel CPU Bracket
- Fan Screws
- Radiator Screws
- Mounting Thumbscrews
- Various Spacers
- Micro USB - USB 2.0 Header Cable
- Waterblock - Fan/Power/ Cable
At this point, we want to mention that NZXT has already applied some thermal paste on the Waterblock, so the X53 RGB is ready to go out of the box!
COMPATIBILITY
Compared to the Kraken M22, the X53 RGB is not compatible with every AMD Socket. Instead of making sure that the X53 can be installed on older AM3/2... Sockets, NZXT decided to only include the newest consumer AMD Socket, the AM4.
On the Professional side, NZXT made sure that the Cooler can be mounted on AMD's Threadripper/Epic socket, but keep in mind that the Bracket for these CPUs has to be purchased separately as it is not included in the box.
Below you can find a list of all the compatible sockets:
| Intel |
AMD |
| LGA 1200 | AM4 |
| LGA 1151 | TR4 |
| LGA 1150 | sTR4x4 |
| LGA 1155 | |
| LGA 1156 | |
| LGA 1366 | |
| LGA 2011 | |
| LGA 2011-3 | |
| LGA 2066 |
INDIVIDUAL COMPONENTS
RADIATOR

In contrast to the Kraken M22 that we already reviewed, there is an obvious difference when looking at the Radiator. The pump is not inside the Radiator anymore. With the X53 RGB, NZXT decided to use the newest Asetek Pump, which is placed behind the Waterblock.
We're unsure if this decision leads to a decrease of increase in cooling performance, it is undoubtedly true that removing the Pump from the Radiator increases the overall Radiator surface. But keep in mind that this may not result in any Performance increase, as there is a Dead-Spot in the center of every fan anyway, thus making the center part of a Radiator unusable.
The Radiator provided with the X53 spans 123x275mm providing space for 2 of the included AER RGB 2 Fans.
Looking from the side, the Radiator is 30mm thick, placing it right in the Center of the Radiator Thicknesses that we are used to.
WATERBLOCK

The Waterblock of the X53 comes with the most differences compared with the M22. Instead of having the Pump in the center of the Radiator, NZXT decided to use an Asetek pump which is placed behind the Waterblock.
This "new" 7th Gen Pump is able to run between 800 and 2800RPM and is supposed to run "unnoticeably" quiet during 800RPM operations.

Unsurprisingly, something that has not changed is the Design of the upper portion of the Waterblock. The iconic NZXT Infinity-Style Mirror with the NZXT Logo cutout right in the Center is still ever so present in this revision.
With a stunning Infinity Mirror and NZXT Cutout in the center, NZXT really grew beyond itself and made any other AIO look like a last-gen piece of tech.
The Outer-Ring, as well as the Inner-Text, are lit up by two separate LED Controllers, which means that even more color mixing is possible than we are already used to.
All of this controlling takes place within NZXT’s Cam software, an Install-And-Go easy to use solution, which lets you control both LED’s in various Colors and add different Effects like Breathing, or turning around.
In order to connect the RGB Features, a Mini-USB Cable is provided in the Box, once connected to the Micro USB Port on the upper side of the Waterblock and a USB 2.0 Header, the light show can begin.
On a side-note, because of the usage of a USB 2.0 Header, it is possible that the NZXT Logo and Outer-Infinity-Ring will be permanently lid. This may seem like an installation mistake, but in fact, most Mainboards out there do provide permanent Power to USB Headers, even if the PC is shut off. So do not be afraid, this is normal but may require some time to get used to.
Underneath the Waterblock, we can find a Copper Plate with the Pre-applied Thermal Paste.

Even though the M22's and X53's Waterblock look very much alike, NZXT decided to increase the overall size of the Waterblock by 10%. This increase may not seem like a lot, but having them placed one besides the other demonstrates how much 10% actually are.
To jump a bit ahead, once build into a PC, it is enormous.
FANS

One of the biggest changes with the X53 RGB is the inclusion of NZXT's AER RGB 2 instead of the AER P120.
These new 120mm Fans can operate at 1500RPM while pushing 52.44CFM with 1.35mm-H2O and yelling at 33dbA.
Instead of build in a Solid Color, the Outer Ring of the Fan includes a Semi-Transparent white piece that houses the LEDs. Once they are turned on, the Fan glows in the color of your liking.

To our surprise, NZXT did not forget that running individual RGB Cables to each fan may be a hassle and be the ground for a bad Cable-Managed System. Instead of the traditional Approach, NZXT made sure that each fan has an In and Out Port for the RGB connection, making it possible to Daisy-Chain the RGB lights by using the provided (very short) wire.
Even though we are very happy with the added RGB functionality, we immediately noticed that spec sheet-wise, the new AER RGB 2 does not come even close to the performance of the original P120, but we will determine that in the Benchmark section.
TUBES

The tubes are almost identical to what we are used to by NZXT. 400mm and Nylon Braided Sleeves are nowadays the Norm for High-End All-In-Ones, and NZXT made sure to deliver exactly what we expected.
With 400mm there will be no problem installing the AIO either in the Front or Top of a case while the Nylon Sleeves provide a nice-looking finish.
INSTALLATION

In order to install the NZXT Kraken X53 into a Case, we used the following components:
- NZXT H510i
- GIGABYTE B550M DS3H
- Ryzen 3700x
- 4x Corsair Vengence
- Gigabyte Vision RTX 3070
- NZXT Kraken X53
- Be Quiet Pure Power 11
Compared to the Kraken M22, the installation of the X53 went way easier than expected.
Instead of forcing the User to unmount the original AMD Bracket completely, NZXT made sure that only the Front Portion has to be unscrewed.
This small, yet powerful change made sure that the installation process went much quicker, and that users that just want to upgrade their system, can do so without disassembling their entire build.

For Intel users, there is still a Backplate included in the box, but because Intel Mainboards are generally not provided a pre-mounted Backplate out of the box, we are not considering this as a downside.
Once the appropriate (or none) Backplate is attached, we could screw down the Retention screws. Once everything was tight, the Waterblock can be placed onto the CPU and fixed by using the included thumbscrews.
The last step was to mount the Radiator and Aer RGB Fans. As we were using an NZXT H510i, we could unmount the Front Fan Bracket and mount both Components outside of the case.
After everything was installed, it had to be connected.
Compared to the Kraken M22, the X53 RGB requires (many) more cables to be connected.
Inside of the box, we can find the Micro USB - USB Header, which like previous Kraken AIO's, has to be connected to the Waterblock as well as a USB Header on the Mainboard.

Additionally, we will find a cluster of cables that all need to be connected. The End of that cluster has to go into the Waterblock. On the other end, the Sata-Power has to go into ... Sata Power, the 3Pin Fan Header has to go into a Pump Header on the Mainboard, or a simple Fan header if non are provided. The last connection is a proprietary NZXT RGB connection, this has to connected to the IN Port on one of the Fans by using the included Extension wire.
Once all of this is complete, the RGB of the Fans can be daisy-chained with the provided adapter, and the Fan Wires can be hooked up to a single PWM header on the Mainboard, by using the included 2-1 PWM Adapter.
Overall, the complete Installation process was "a lot" compared to the Kraken M22. But we have to point out that it resembles a LEGO set. A into B, C into D, and you're done. Even though you have to connect a lot, it is a straightforward and easy process.
Even though controlling RGB devices with one of the usual Mainboard Software has become an easy task in recent years, NZXT still managed to deliver a user-friendlier experience. Once the CAM software is installed, it is easy to control both RGB lighting effects. Furthermore, the CAM software also offers some additional Monitoring features, such as CPU/GPU load, Speed, Fan Speed, and Temperature, even in-Game.
APPEARANCE

Just like the Kraken M22, The X53 shines the most with its design.
By enlarging the Iconic NZXT Kraken Waterblock, the X53 manages to shine and impress even more. The included AER RGB 2 Fans make sure that the rest of the case is equally lit.
Overall, we are huge fans of the Kraken Design, and after having built the Kraken X53 into multiple cases, we think that it fits almost everywhere.
BENCHMARKING
During all of our Benchmarks, we use a Ryzen 3700x @4.5Ghz and 1.4vCore.

Before we started to benchmark the Kraken X53, we wanted to know how much of an impact the new AER RGB 2 Fans have on overall performance.
To test this, we installed the Kraken M22 (because of its single Fan setup) and tested both sets of fans.
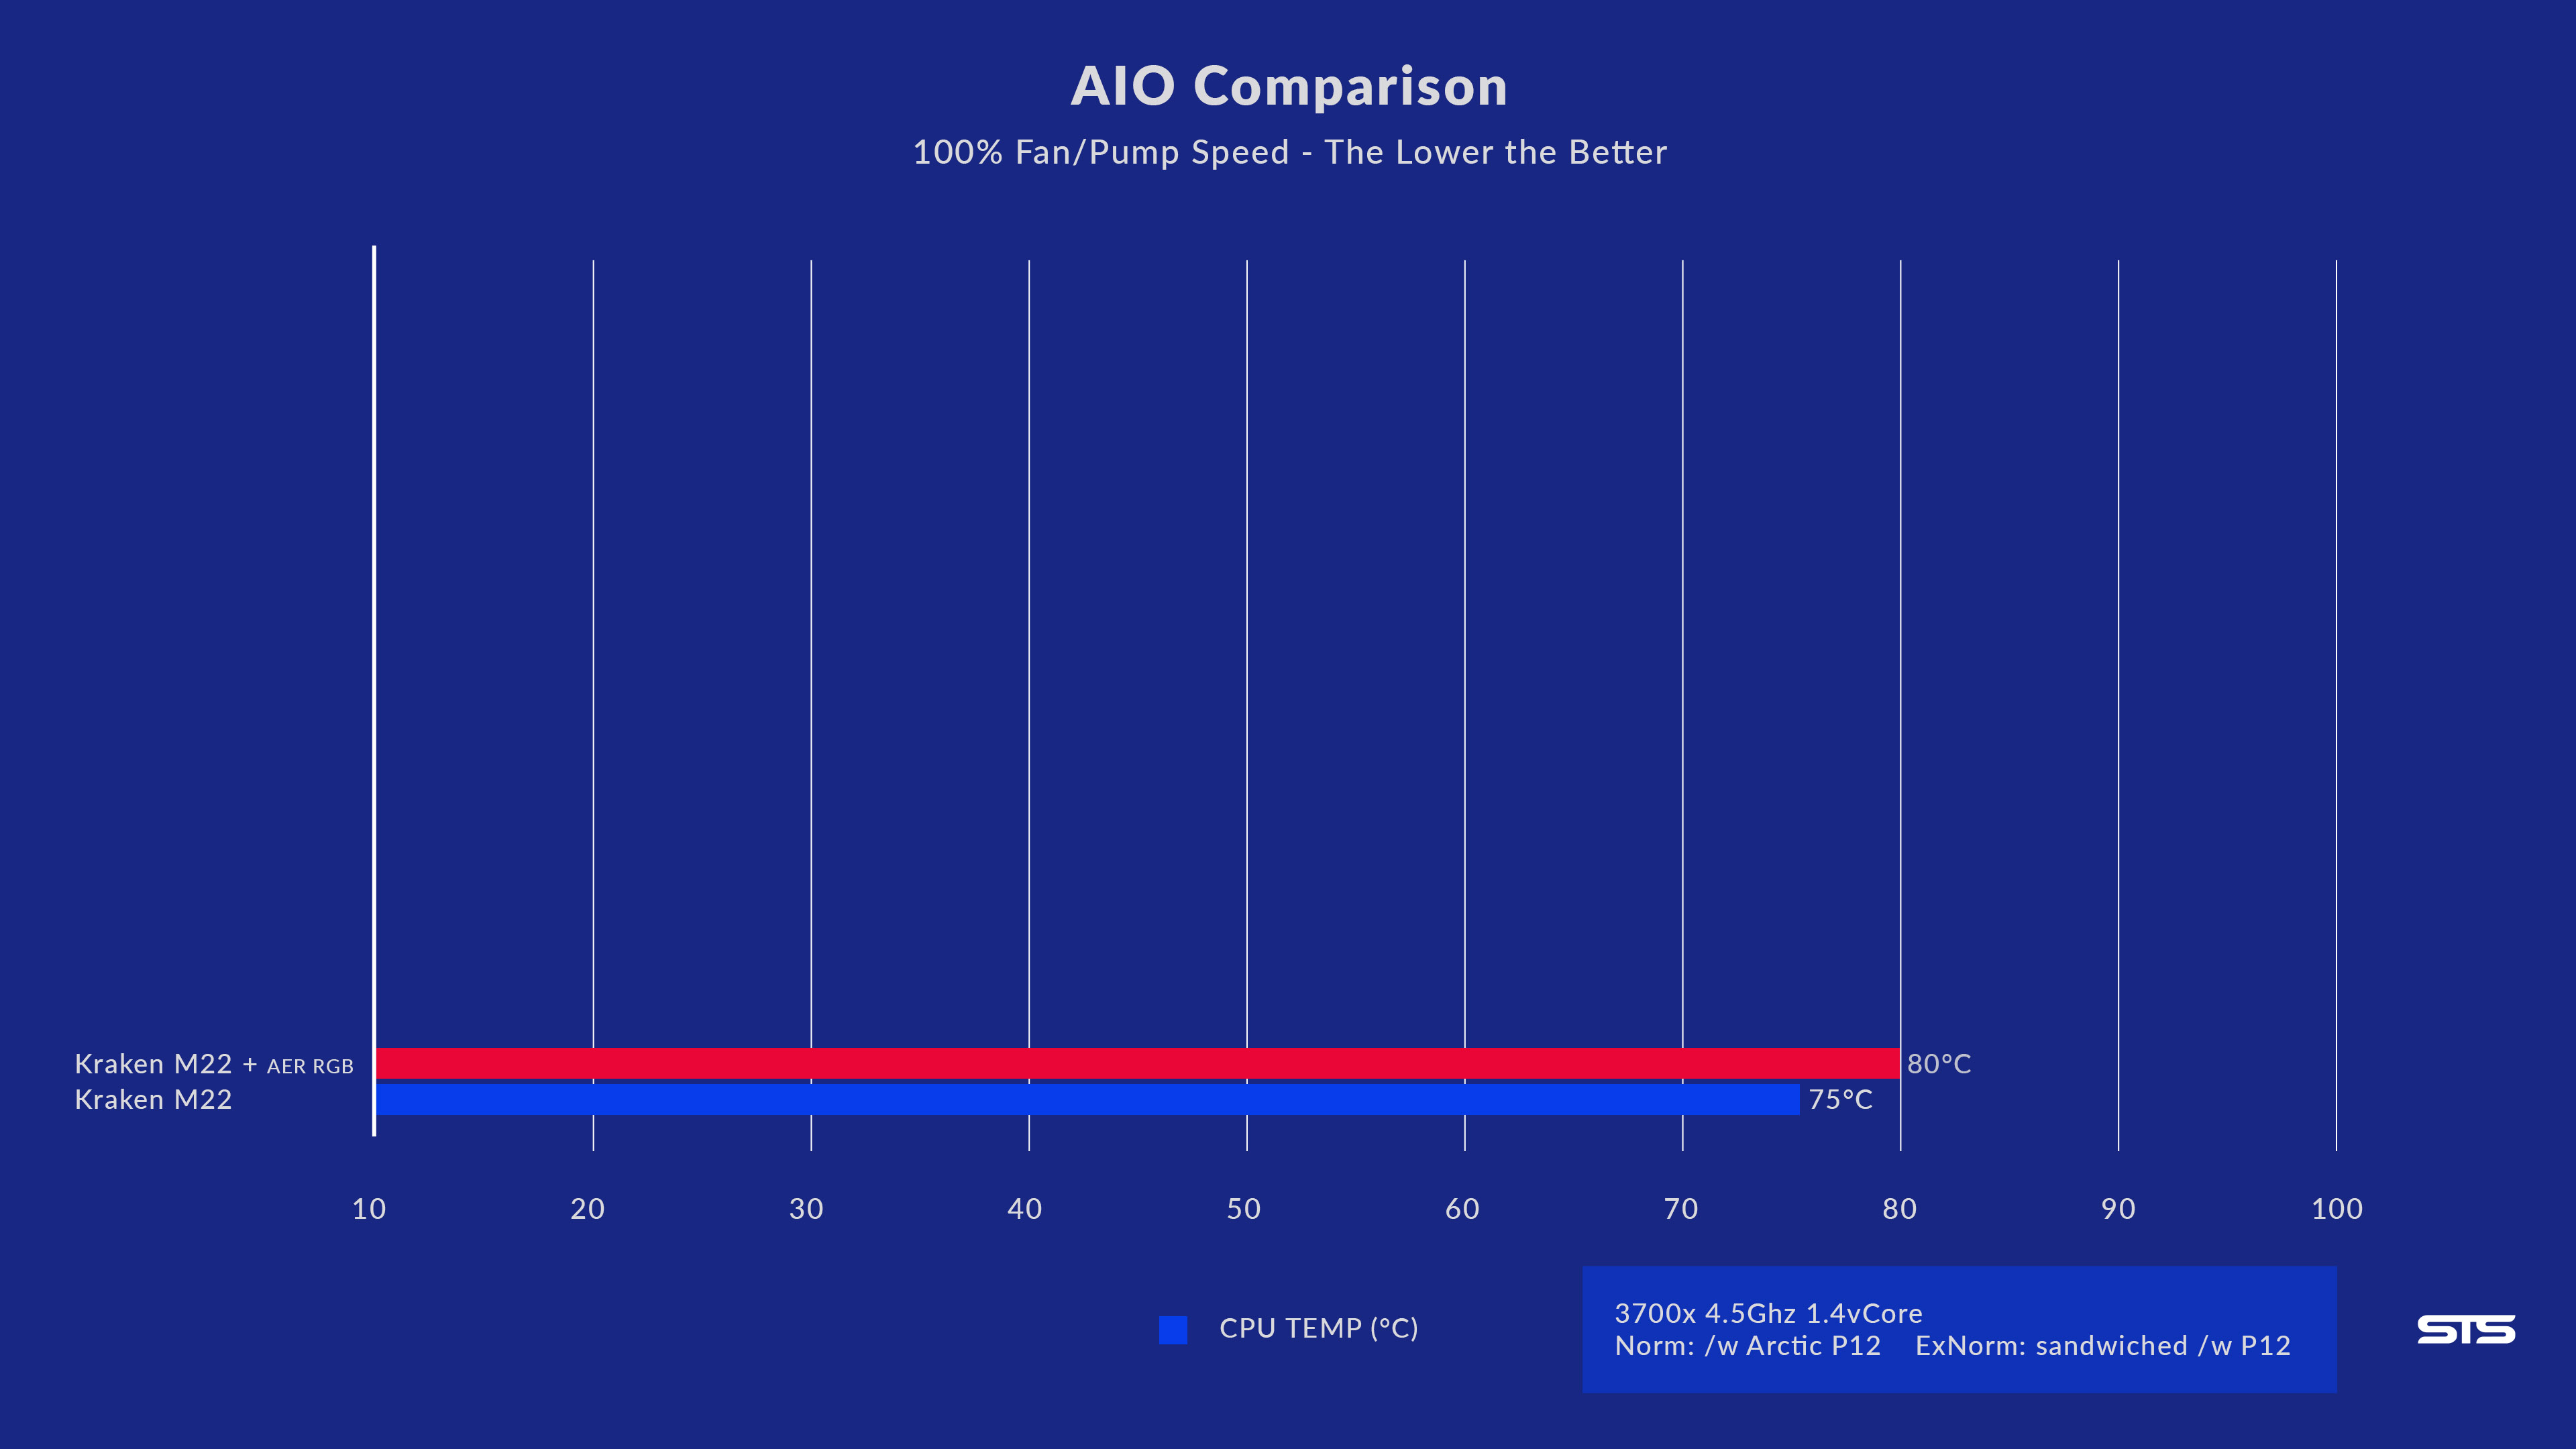
Unfortunately, the AER RGB 2 had a huge impact on performance. With 5°C more, the AER RGB 2 are not even close to the P120.
But Fan Performance is not everything. As Pump Performance and the Radiator heat dissipation can have an equal impact, we are not losing hope and keep on.
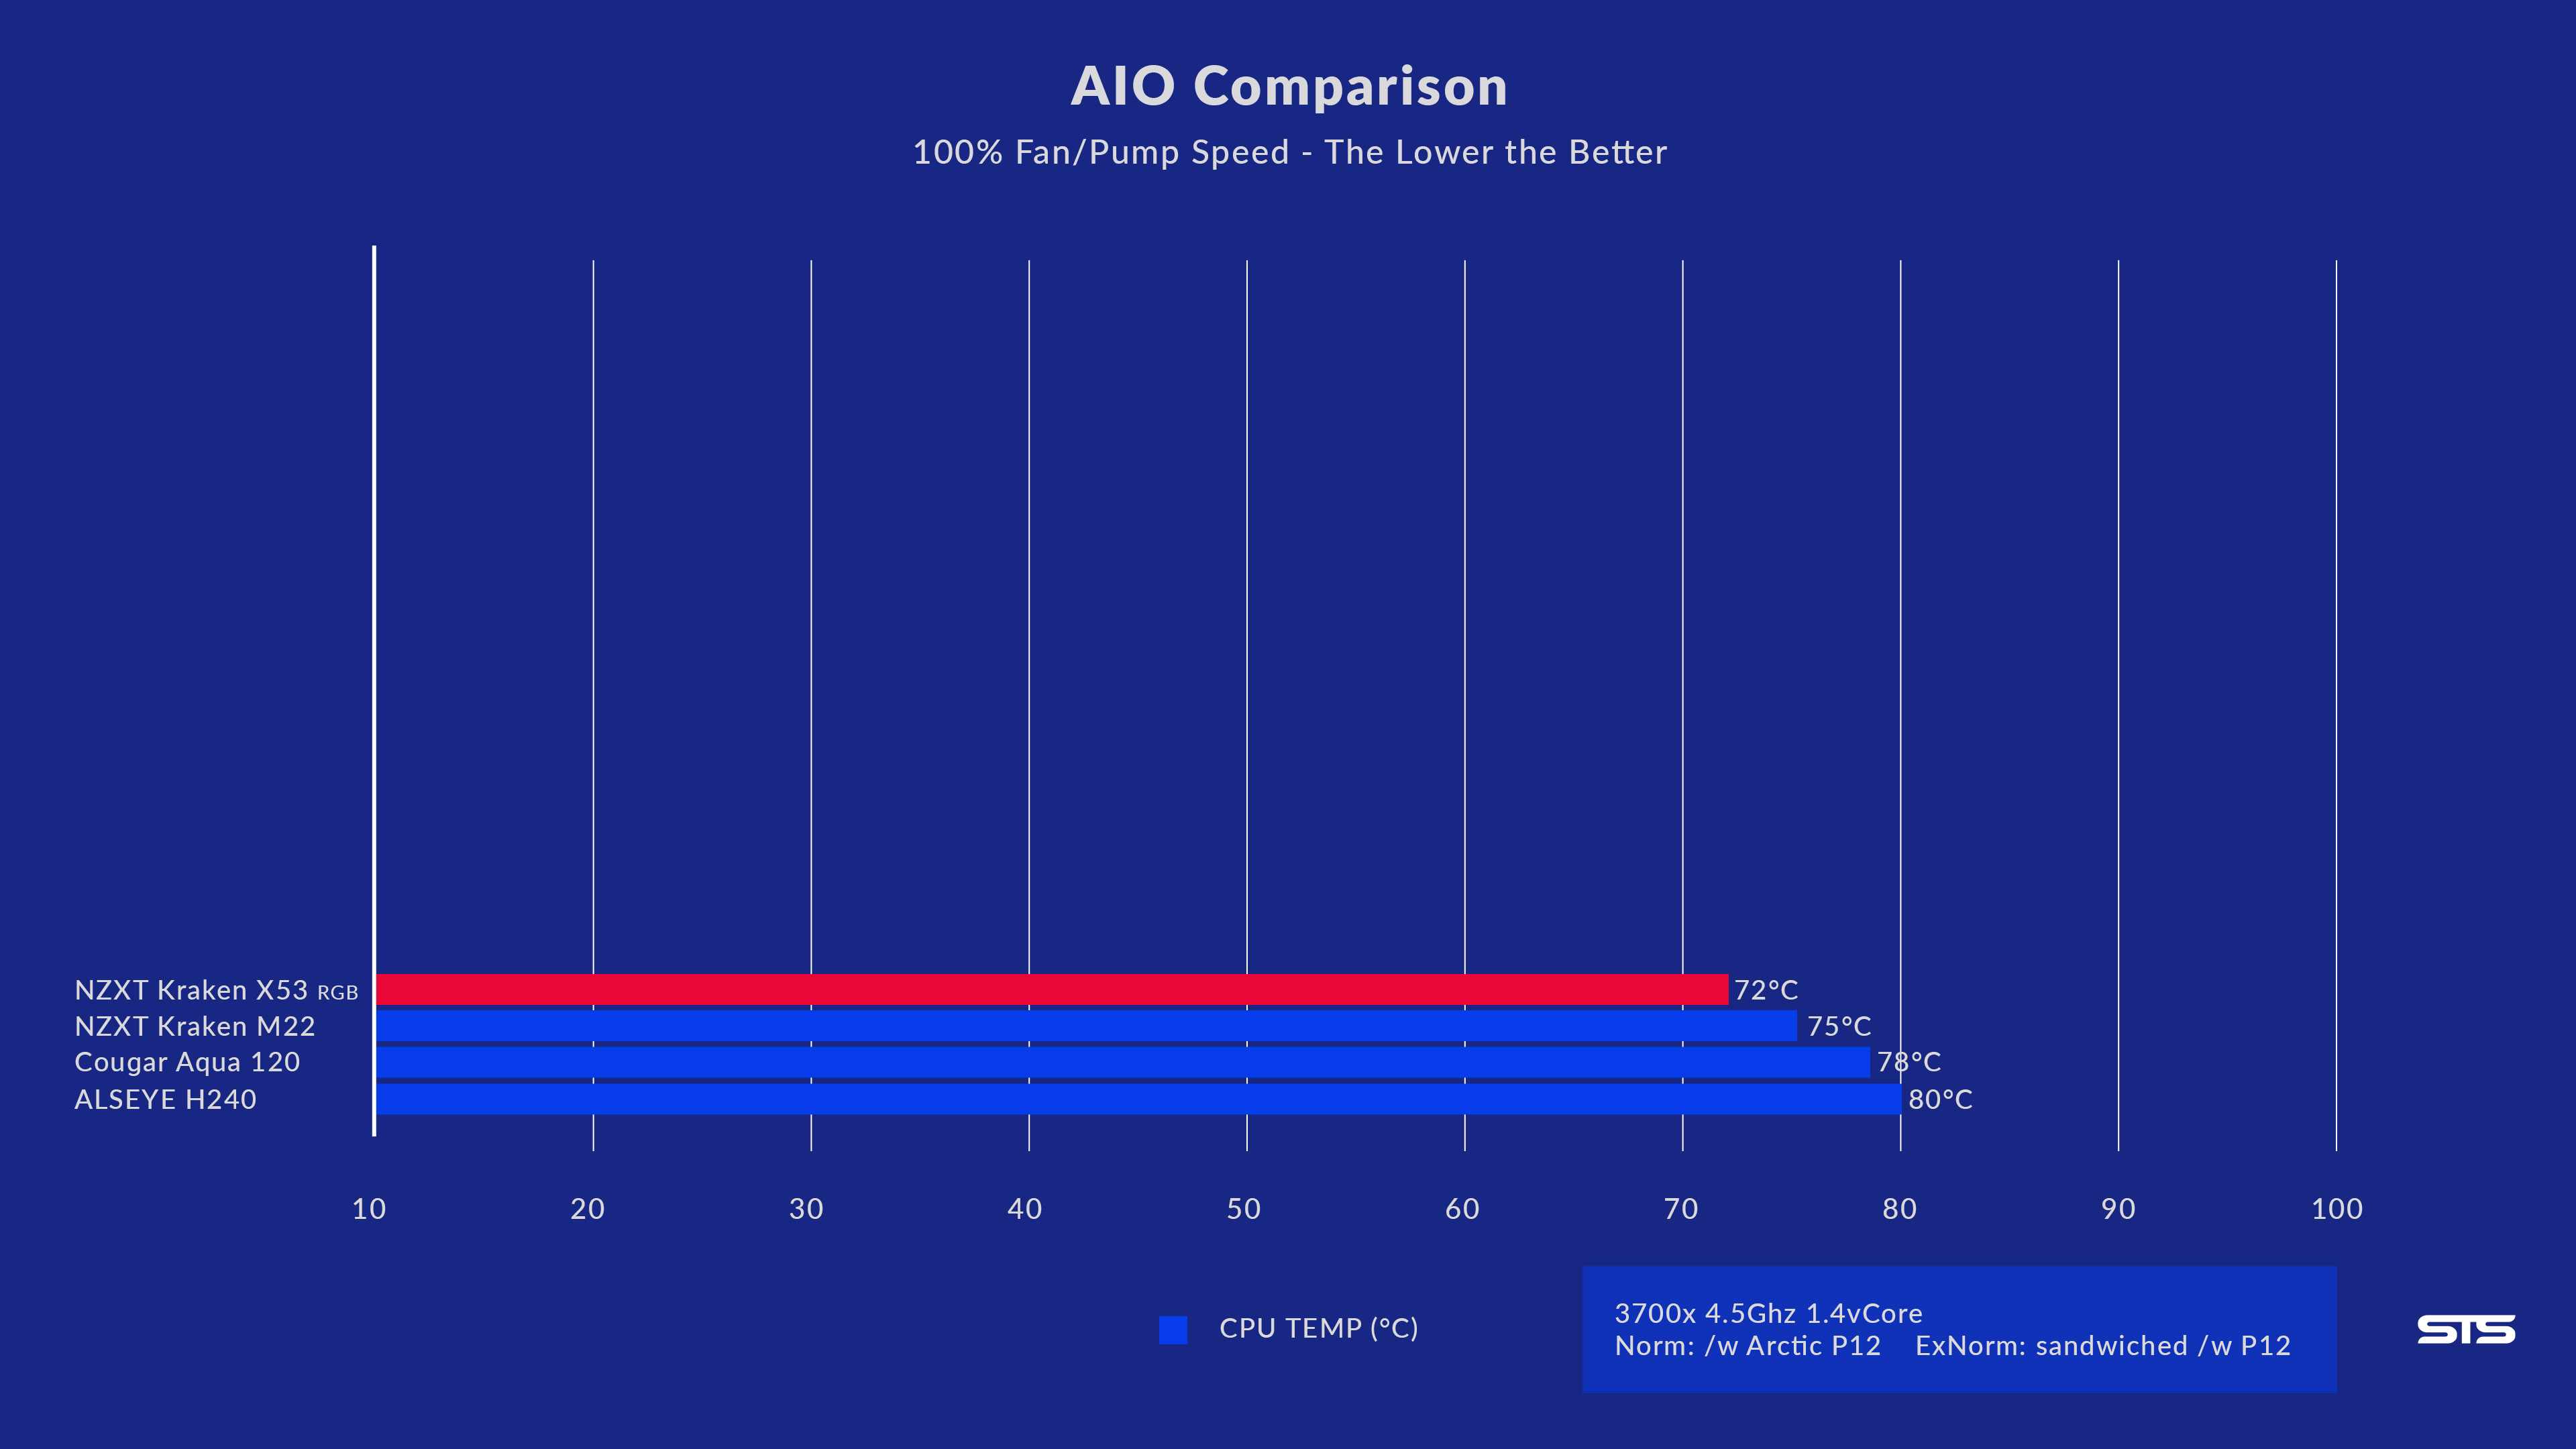
With the X53 RGB installed on our Testbench, the X53 managed to keep the CPU at 72°C, placing it at the top of our list. (keep in mind that there is only one other 240mm AIO)
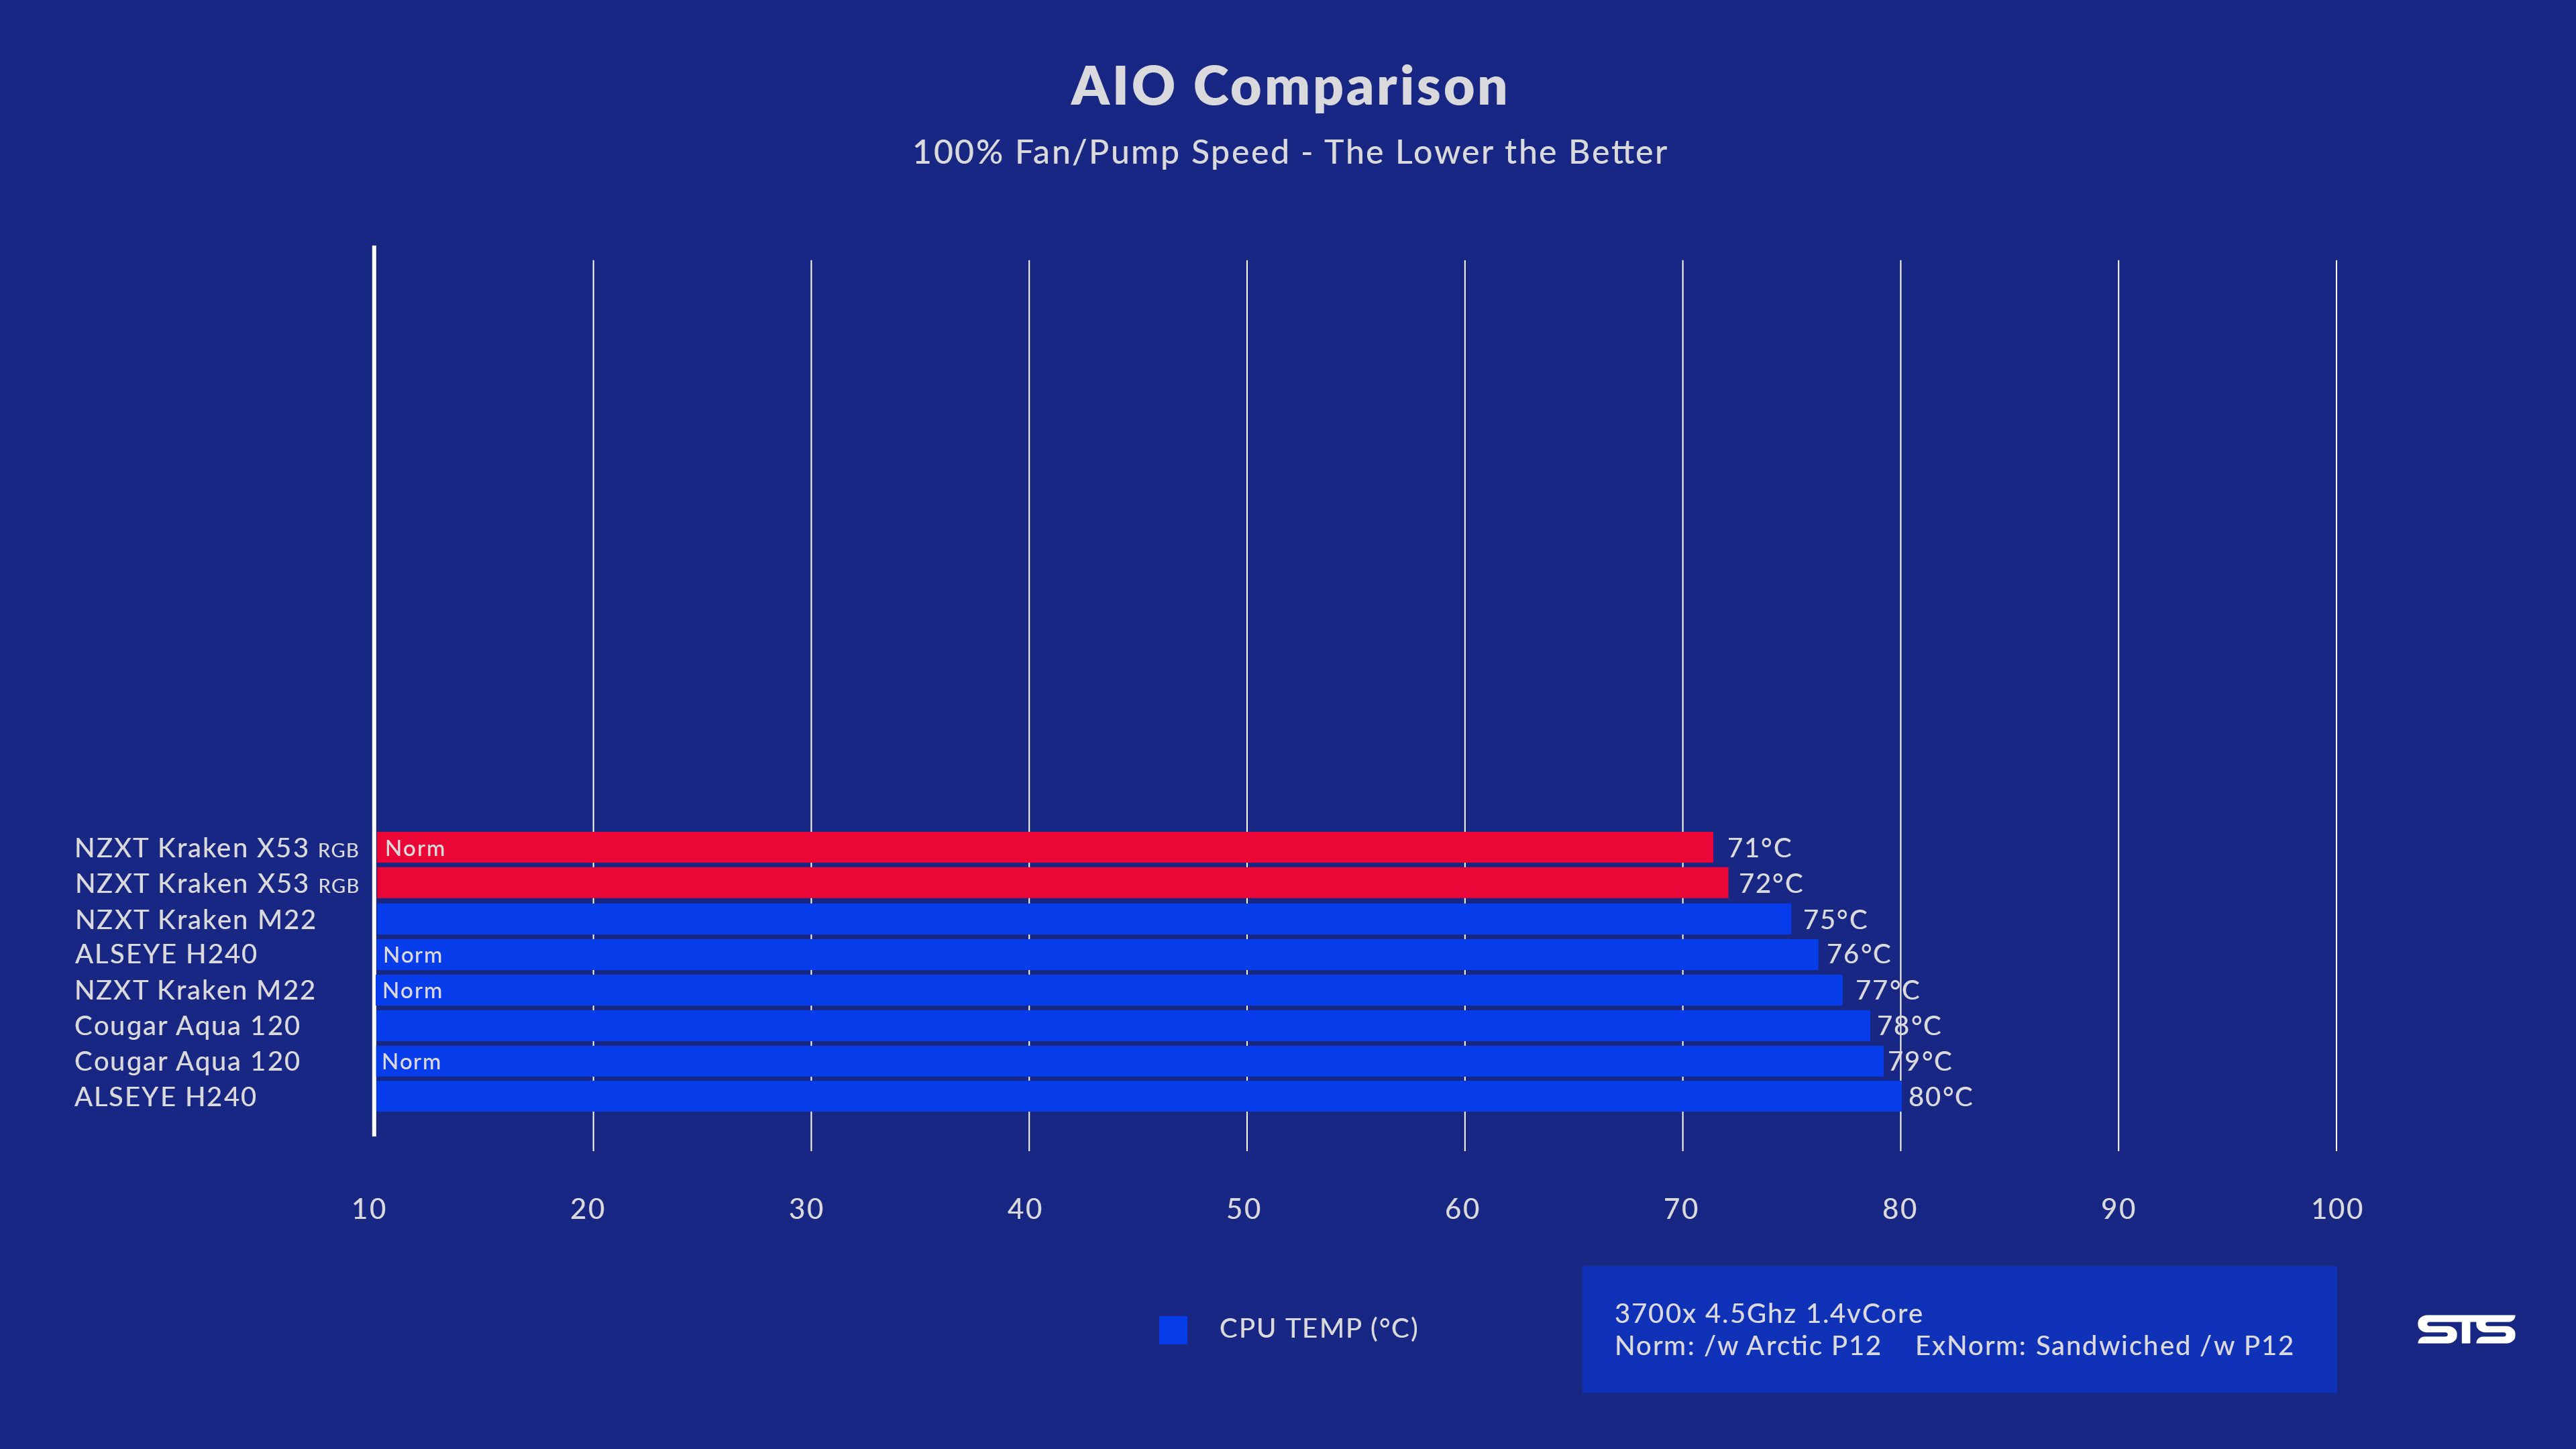
As the next Part of our Benchmark, we normalize our AIOs, For this, we ditch the included Fans and install our Arctic P12's on the Radiator.
With 2 P12's, the X53 managed to keep the CPU at 71°C.
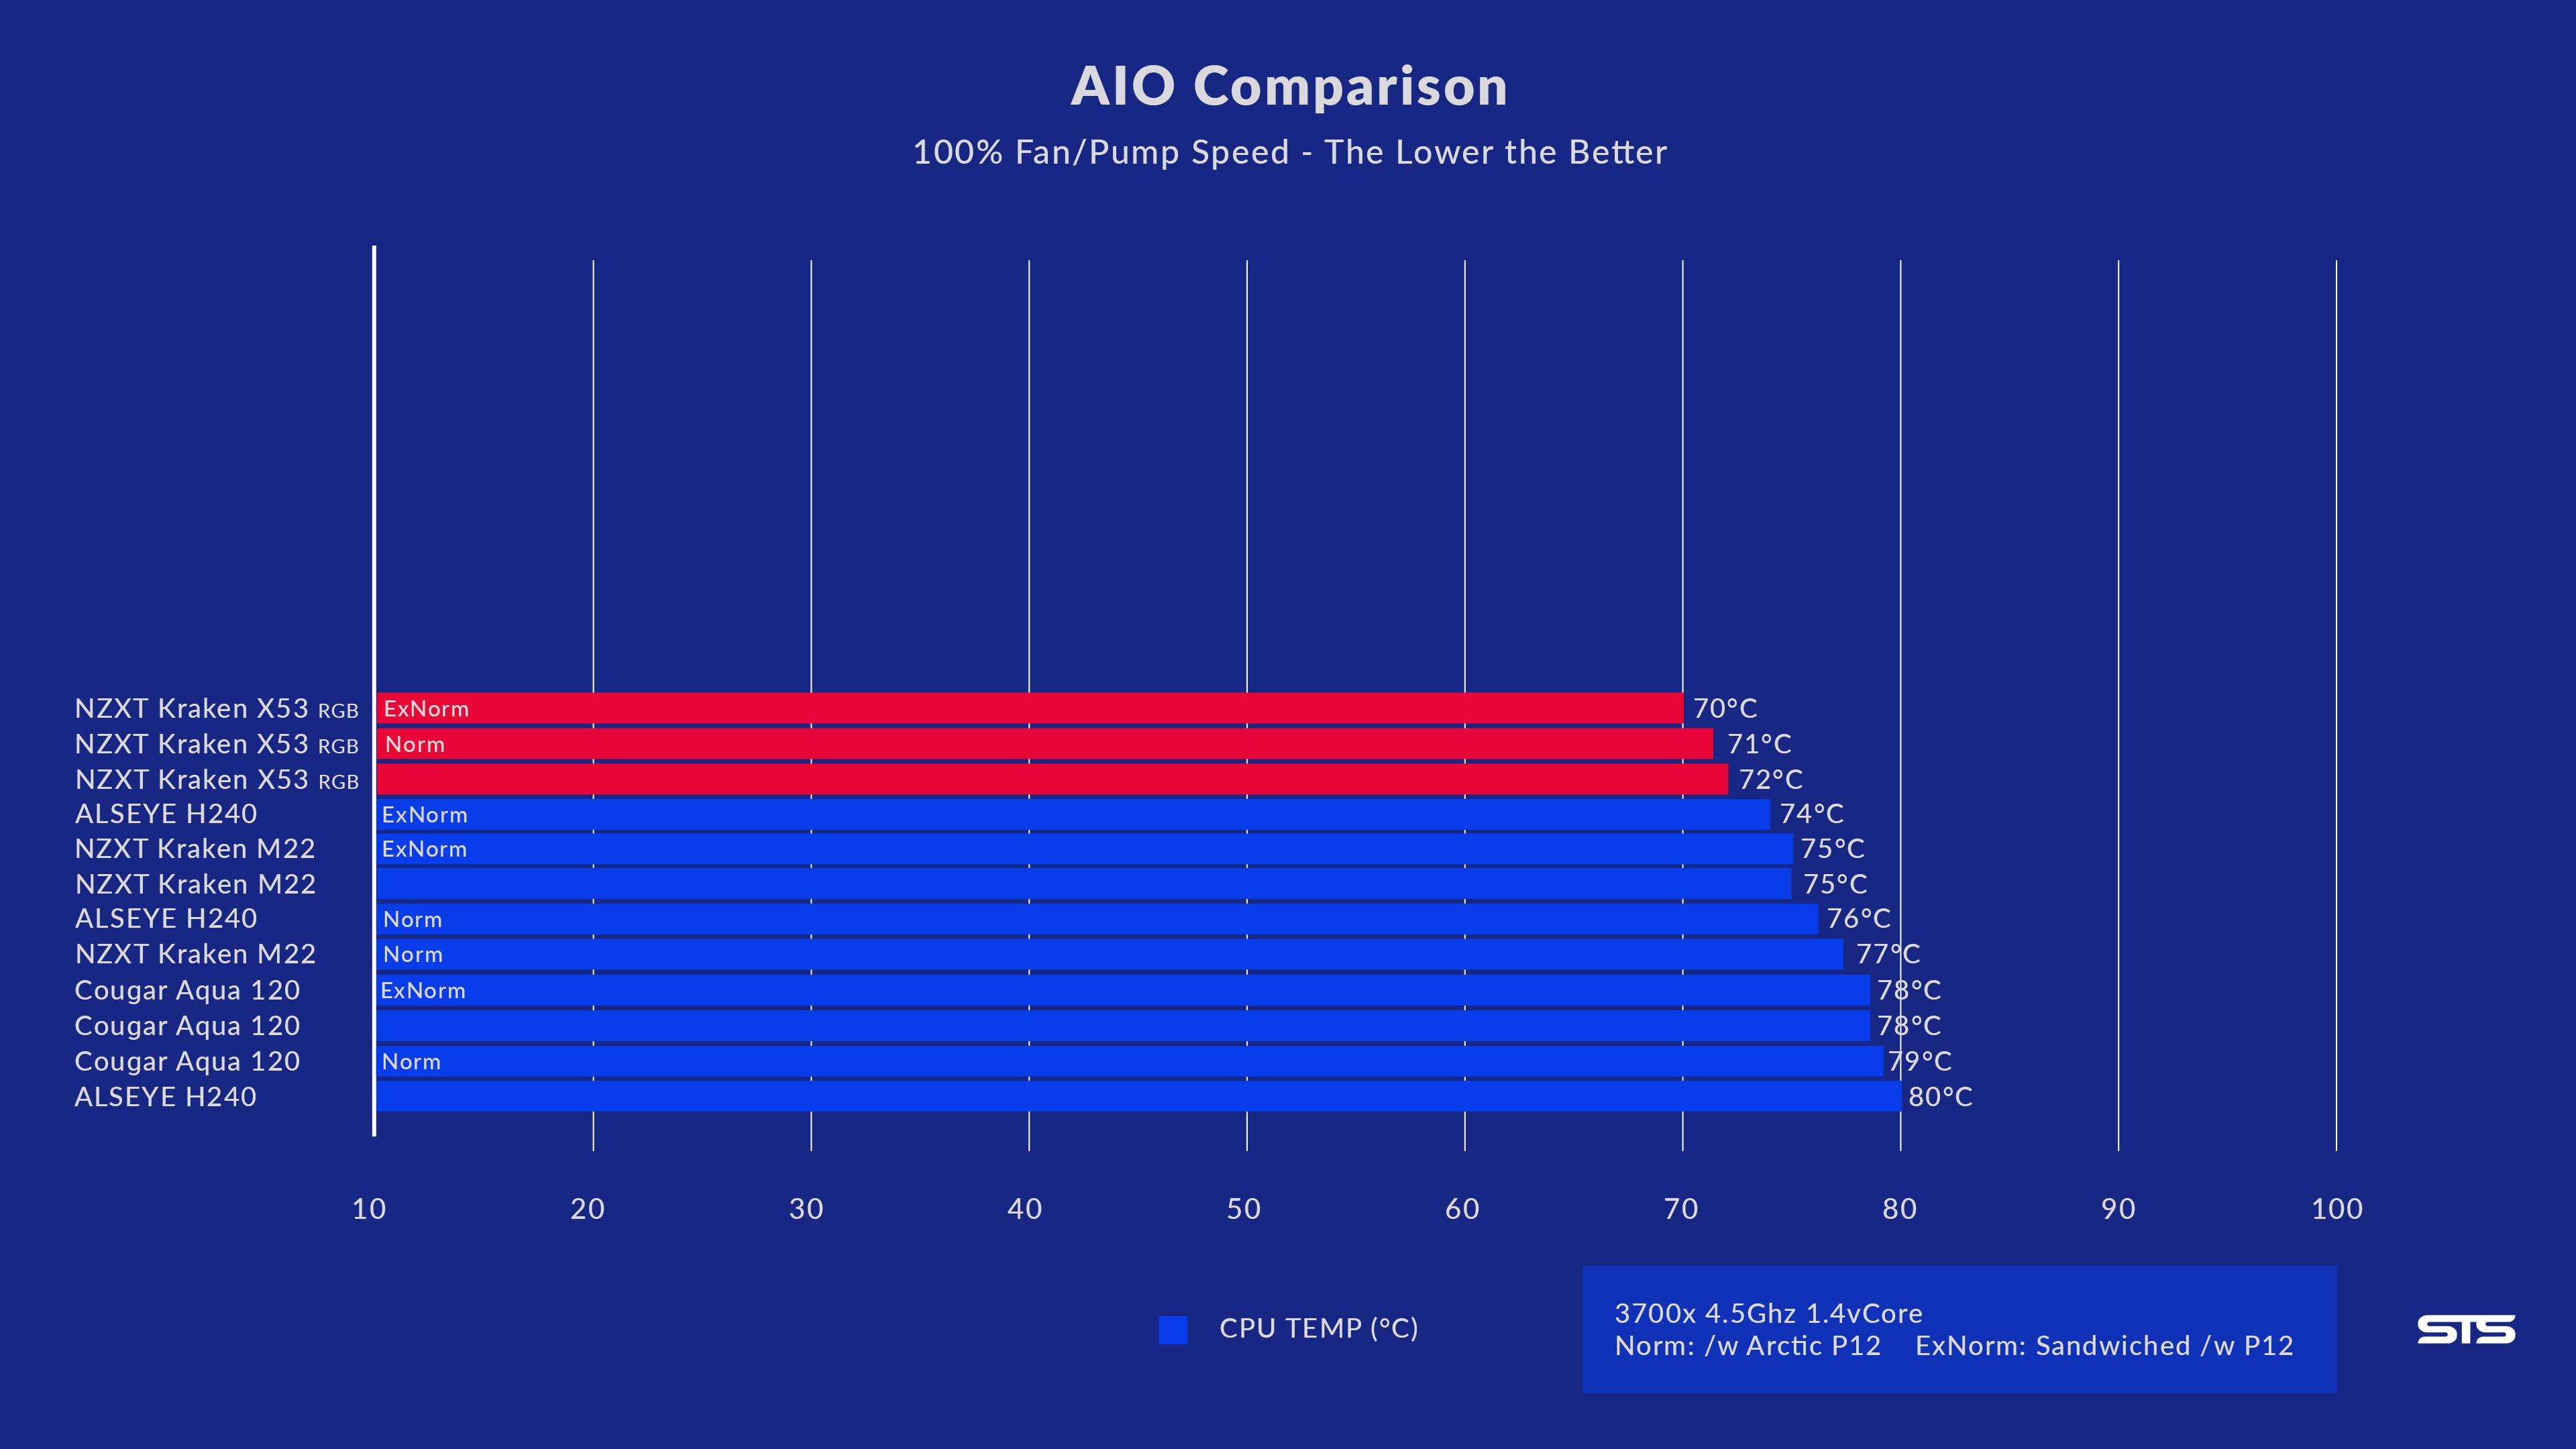
By Sandwiching 4 P12's in a Push-Pull configuration onto the X53 RGB, the AIO managed to get the Temperature down another keeping the CPU at 70°C.
This last Benchmark showed us, that even though the AER RGB 2's are not squeezing everything out of the Radiator & Pump, NZXT managed to do a pretty solid Balancing job.
With an improvement of only 2°C, there is not a lot that the AER P120's could do with this setup, thus demonstrating, that lower Fan Performance may not be a negative aspect of the X53.
CONCLUSION

Overall, we are quite happy with the NZXT Kraken X53 RGB.
We are huge fans of its iconic design, and including RGB Fans made the whole set even better.
While the Performance of the X53 RGB is not best-in-class, it still managed to keep the CPU at a solid 72°C, which is what we expected from a 240mm AIO.
Just like with the Kraken M22, we have to keep nagging on the highest level. Having an Airflow orientation arrow on the fan will make it easier for New members of the PCMR community to understand in what orientation they should install the fan.

But NZXT also did a lot of positive improvements, the possibility to keep the original AMD Backplate made installation much easier, while the 10% Bigger Waterblock created an even better design.
Additionally, NZXT build-in another little positive feature. In contrast to the previous Kraken AIO's, the Upper Section (NZXT Logo & Infinity Mirror) is now rotatable. Because of this, it no longer matters in what direction you install the cooler, it can always be rotated to be straight.

When it comes to price, we think that it may be a bit over-the-top. With around 160$ or 130€, the Kraken X53 is everything but cheap. Even though the Build Quality, Inclusion of NZXT Cam, Compatibility, RGB-Over-USB... are all great aspects, we think that the price-to-performance is not quite right.
In Summary, the NZXT Kraken X53 RGB delivers a stunning Design, while performing "ok". Overall we can recommend the Kraken X53 RGB to everybody that wants to go with the NZXT Design, but for those who are looking for pure performance, you may want to look elsewhere.

Arctic Liquid Freezer II 240 ARGB Review
Arctics Liquid Freezer II is one of the most known and best AIO series out there. The 240mm form factor is also the most used
Read More
Scythe Kotetsu Mark 3 Review
The Scythe Kotetsu has been a solid mid-range performer in the past. Lets take a closer look at its newest Mark 3 revision an
Read More
Inter-Tech C-702 Diorama Review
After the Panoramas success, Inter-Tech now revealed its little sister case, the Diorama C-702. But dont let size fool you, t
Read More
Scythe Kaze Flex 120 Review
Scythes Kaze Flex fans seem to be the perfect example of a case fan. A ton of air and near unhearable noise. Its time to take
Read More