Cooler Master MasterFrame 700 Review
Introduction
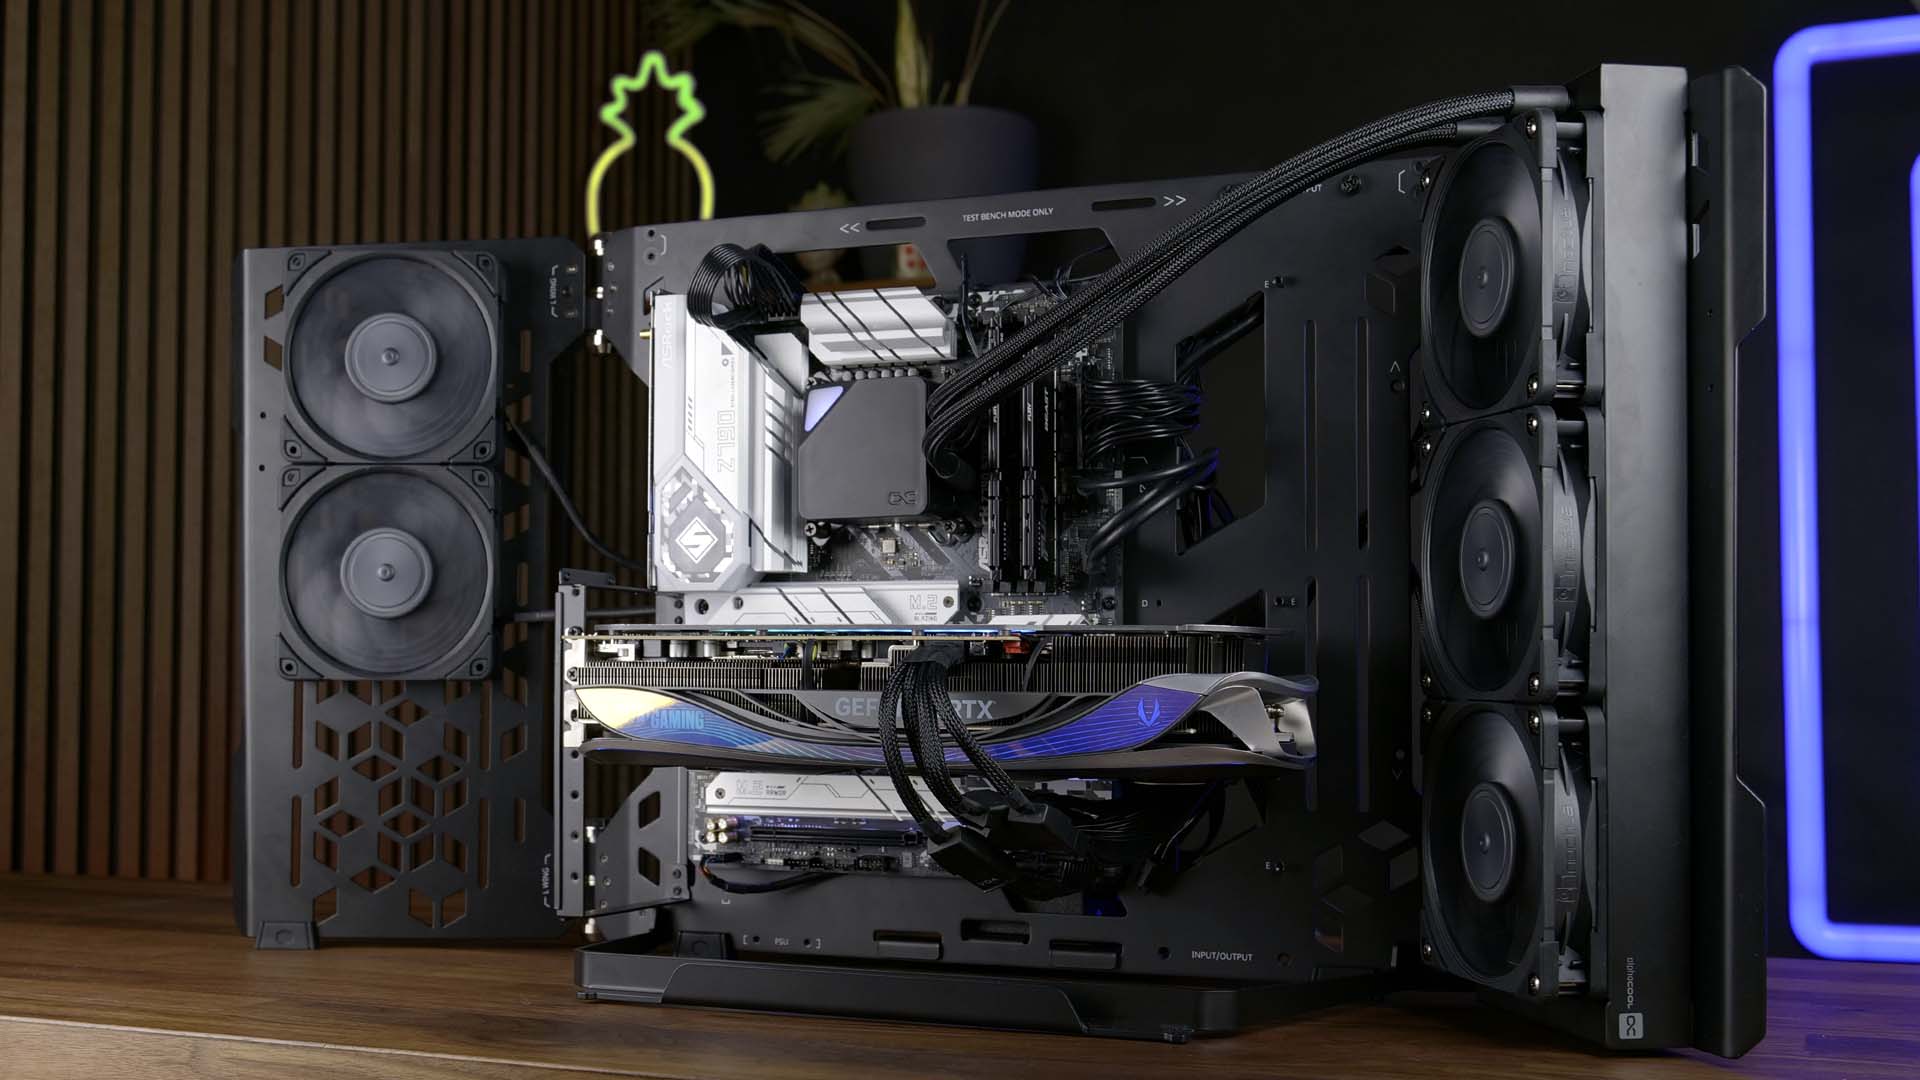
Cooler Masters MasterFrame 700 is supposed to be both a showcase capable of showing off your beautiful build and a fully capable testbench allowing you to benchmark components in masses. Let's take a closer look and find out if Cooler Master managed to combine the best of both worlds!
Positive
- Open-Air Airflow
- No Max GPU Length
- No Max CPU Cooler Height (without the glass)
- Optional Tempered Glass Front Panel
- Excellent Build Quality
- Can be Open Air Case & Testbench
- Good IO
Neutral
- Rubber feet are ok
Negative
- CPU Cooler and GPU limitation due to glass
- Hole behind mainboard is not big enough to swap LGA1700 backplates
What's in the Box?

Unlike most cases, the MasterFrame 700 doesn't come in a Ready-to-Use box. The surprisingly heavy and big box contains individual layers of styrofoam that contain individual pieces of the case which the user needs to assemble himself.
The building process of the case doesn't take very long. The Manual explains every step the user needs to take and after about 20-25 screws, the case is ready to be used.

Depending on the use case, the user can decide between using the case as a TestBench or an Open Air showcase.
Naturally, there is a quite big difference in the building process. While the Open Air mode uses the brackets to hold onto the optional glass, the TestBench mode uses the same brackets as feet.

Included in the box we will also find multiple PSU brackets in case the user wants to build a dual PSU system.
Specs
As the case can be used in multiple modes with very different purposes, there are slight variations in the Cases compatibility. However, these differences are limited to a single Radiator location.

Additionally, there are slight variations in CPU and GPU sizes depending on the usage of the optional front glass panel.
As these differences can be explained with a single if, as well as any other metric being identical, we decided to combine all of the case's specs into a single table down below:
| Name | Cooler Master MasterFrame 700 |
| Color | Black |
| Type |
Open-Air Showcase TestBench |
| Maiboard Sizes |
miniITX microATX ATX E-ATX SSI CEB SSI EEB |
| PSU Size | (ATX) No Limitation |
| PSU Position |
Behind Motherboard Behind Motherboard (but lower) On one of the Wings |
| Side Panel |
No Side Panel but 2 wings with adjustable angle |
| CPU Cooler Height | 158mm if Glas is used - Unlimited otherwise |
| GPU Length |
310mm Recommended 380mm with closed Wings Unlimited with fully open Wings |
| GPU Width |
Pre- RTX 4000 Compatible (12VHPWR doesn't fit) (if glass used) 90° adapter can make them fit |
| 3.5" Drives | 4x behind Motherboard |
| 2.5" Drives |
4x behind Motherboard (shared with 3.5") 3x on SSD Bracket |
| IO |
2x USB3.1 Gen 2 Type A 1x USB 3.2 Gen 2 Type C Combined Audio In & Out Start Button |
| Dimensions |
410mm High 950mm Wide with fully open Wings Width can be adjusted with Wing angle |
| Fan Spots |
3x 120 / 2x 140mm Spots on left Wing 3x 120 / 2x 140mm Spots on right Wing |
| Included Fans | none |
| Water Cooling |
up to 360/280mm Radiator on left Wing up to 360/280mm Radiator on right Wing Up to 420mm radiator on additional bracket (ONLY in Benchmark Mode) |
| Extras |
2x PSU brackets included 6x Rubber feet included Optional Tempered Glass Front Panel included |
Compatibility
Mainboard

Mainboard-wise, the MasterFrame allows us to do practically everything we would ever want to do. From miniITX all the way up to EEB and CEB E-ATX motherboards, everything is allowed here.
No matter if you decided to use the Benchmark mode or Open Air Mode, every regular motherboard size will fit.
PSU
From a length perspective, we are not aware of any PSU in existence that would pose a limitation on the MasterFrame 700. Therefore, the choice of ATX- Psu is fully up to you.

There are 3 different locations to install a PSU (on) the MasterFrame 700. Two of these spots are between the back of the Motherboard plate and the back bracket. One is at the highest point while the second position is at its lowest. However, keep in mind that using the top spot will take away the 4x HDD/SSD spots provided by said bracket.

The last position would be on one of the adjustable wings.
Inside the box, we will find 2 PSU installation brackets. Therefore, we are able to use 2 PSUs simultaneously.
GPU
Although Cooler Master recommends to use GPUs shorter than 310mm, we can ignore this metric as the adjustable wings allow the GPU to be as long as you want it to be.

However, in case you decided to use the case as an Open-Air showcase, there is a specific limitation in case you decided to use the optional Front Glass Panel. If this one is being used, the new 12VHPWR cable found on RTX 4000 cards doesn't fit anymore.
This problem can however be resolved by either using a 90° adapter or simply not using the glass.
CPU Cooler
Similarly to the GPU, there is a maximum CPU cooler height limitation in case the MasterFrame is being used as an Open-Air Showcase including the optional glass. If this is the case, the cooler cannot be higher than 158mm.
Similarly to the GPU, not using the glass will immediately solve this issue.
Fans
The two adjustable wings of the MasterFrame 700 are responsible to move air around the case.
On both wings, we can mount up to 3x 120 or 2x 140mm Fans.

For both of the MasterFrames use cases, we can adjust the angle of the wings, thus focusing the air stream of a specific point where most air might be needed.
This can be highly interesting in Test-Bench mode in which the Motherboard VRM might need some additional help to be kept cool.
Watercooling
Similarly to the Fans, the Wings of the MasterFrame are responsible for radiator support. On each Wing, we can mount an up to 360 or 280mm Radiator.

In case you decided to use the case as a Benchmark machine, we can use the additional 90° brackets found in the box to mount another up to 420mm radiator to the top of the case. Either in a standing or a hanging position.
Cable Management

By the case's very nature, in both modes, cable management is more of a wish than a feature. The case being open from every side and angle, cable management is notoriously hard and very limited.
In the back of the case, Cooler Master included a couple of straps to help you organize some things, however, this will not solve the issue entirely and you will be forced to zip-tie the cables to whatever you find available.
Cooling
The MasterFrame 700 can be used as either an Open-Air showcase or a Testbench. In both modes, the case operates in either Open-Air or almost open-air, making the usual "cooling" comparison between cases rather useless.

However, as far as cooling compatibility is concerned, the MasterFrame can score points that most other cases can't.
Used in Open-Air mode, the Masterframe can house up to 2x 360 or 2x 280mm rads. Additionally, If the glass is not used, the Air Cooler support can be considered limitless.
For Benchmark mode, all of the stays true, however, the additional 420mm radiator support can now be used, making the cooling potential of the case even bigger.

Additionally to that, the "open-air"-ness of the case creates a theoretical problem of there being no air that travels across the motherboard, thus cooling down the VRMs. The MasterFrame solves this issue by allowing you to adjust both wings to an angle that you need to be to make the system work flawlessly.
On the right side of the Mainboard plate, we can find two rails allowing the user to mount additional Watercooling components such as Pumps or Reservoirs.
IO
The little IO bracket included with every MasterFrame 700 consists of 2x USB3.1 Gen 2 Type A, 1x USB 3.2 Gen 2 Type C, a Combined Audio In & Out, and a Start Button.
This equips the case relatively well making it 2023 ready.

However, there is more. Instead of there being only a single IO position, the MasterFrame allows the whole IO bracket to be installed in one of two available spots depending on the user's needs.
Design - Open-Air Mode

Design-wise, the case can definitely score some major points.
The two adjustable wings are huge eye-catchers whilst the open Front allows the build to be fully seen.
In case the user decides to protect his system from unwanted touching, he can use the optional front glass panel with its slightly shadowed tint, making the build just look even more impressive.

The real beauty of the case however comes from its ability to house custom dual rad cooling systems spanned across the whole case.
Generally, the MasterFrame 700 in its Open-Air mode is a "the sky is the limit" approach.
On its own, the 3mm thick metal refined with white text and little holes are making the case look incredibly futuristic and high-quality. However, as everything can be seen, it will be fully on the user's side to choose components that look good.
Installation
The case being full- or almost open air, building in it is unsurprisingly easy. Everything can be reached easily and there has not been a single issue for all of our builds.

However, we do acknowledge that this is less due to Cooler Master's amazing engineering team, and more to the fact that it's basically a sophisticated plate with holes. Therefore, the case get's a 100- score for installation easiness, but with the asterisk that not having a 100- score would be a shocking discovery.
Conclusion Benchmark Mode
Until this point, there was little negative to be said about the MasterFrame's Benchmark Mode.
GPU, CPU Cooler, air or water, Motherboards, PSUs, there is nothing creating a restriction for its user.

Although we believe the case may be an amazing, CPU, GPU, Ram, and Mainboard Benchmarking case, it is not for CPU coolers.
As we had to find out, the hole behind the motherboard plate does not allow it to quickly swap LGA1700 backplates without requiring the removal of the upper 3 motherboard screws.
This, unfortunately, would make it impossible for us to consider it a viable option due to the added time between each cooler swap.
But, if Cooler benchmarking is not on your list, we can definitely recommend using the MasterFrame 700 as your next torturing device.
Conclusion Open-Air Mode
In an Open-Air mode scenario, the needed "quick swap" of a cooler backplate is no longer needed, therefore there are no minus points to be collected here.
However, there are still a lot of positive points to be collected.
All in all, the case offers incredible cooling support, up-to dual 360mm radiator systems are nothing common.

However, all of this also comes with a small limitation. We believe it is best to leave out the optional front glass panel. Although it might add a shadowy look to the build, it also adds RTX 3000 restrictions as well as a 158mm limit on a CPU air cooler. If the glass is not being used, all of these restrictions are eliminated and the User can use absolutely every hardware available as of now. ( The look of which still being in the user's hand )
Due to this limitless approach, we can recommend the MasterFrame as an Open-Air showcase.


Arctic P12 ARGB 0db Review
Its undeniable that we at STS are huge fans of Arctics P12 Fans! Now Arctic decided to slap a couple of RGBs in the center! B
Read More
Arctic Freezer A13X / i13X Review
Although the Arctic Freezer A13X & i13X might look like a normal cooler, don't be mistaken. This miniature single tower coole
Read More
Gelid Tranquillo Rev.5 Review
With their 5th iteration, Gelids Tranquillo Rev.5 CPU Air cooler is aimed towards the smaller single tower market. Lets find
Read More
Scythe Kotetsu Mark 3 Review
The Scythe Kotetsu has been a solid mid-range performer in the past. Lets take a closer look at its newest Mark 3 revision an
Read More